Stable
1.9.9774
Daily-driver build with the safest release cadence.
- Updated
- 14 weeks ago
- File Size
- 515.39 MB
- Release Notes
- Open notes
Stable is the recommended track for most users. Alpha gets you the newest capabilities first.
Daily-driver build with the safest release cadence.
Fastest release track with the newest features and experiments.
Every release stays linked here so you can inspect what changed before you switch versions.
Раньше для Trees и Macros был только один способ управлять тем, когда они начинают «тикать» и выполняться соответственно.
Если нужно было запускать дерево по нажатию горячей клавиши или пока клавиша удерживается, приходилось создавать отдельную Aura с триггером HotkeyIsActive.
В новой версии ту же горячую клавишу можно назначить прямо в Tree/Macro. Это заметно уменьшает количество действий и сильно упрощает настройку.

В обычных триггерах HotkeyIsActive есть механизм, который позволяет ограничить работу горячих клавиш конкретным окном, приложением и т. д.
Этот механизм напрямую отвечает за включение и отключение обработки горячих клавиш в каждый конкретный момент. Добавив одну или несколько аур, вы можете задать точный набор условий, которые должны выполняться до того, как Trigger вообще начнет что-либо делать.

Например, если привязать Aura с условием WindowIsActive, Trigger будет реагировать на нажатия только тогда, когда активно окно игры.
В более сложных сценариях Trigger можно связать с внутриигровым состоянием. Например: вы нажимаете RMB (это часть настройки HotkeyIsActive), И при этом мощный скилл уже вышел из кулдауна (linked condition). Вместо обычного действия на RMB будет сымитировано нажатие другой кнопки, которая кастует этот скилл. Хороший пример — автоматизация Vaal Skills в Path of Exile: у вас есть обычная версия умения на кнопке, которую вы постоянно жмете, и как только Vaal-версия накопит достаточно souls, она автоматически сработает без необходимости отслеживать это вручную.
В BT эквивалентом будет добавление Enabling Condition прямо на само дерево — так же, как и раньше. Горячая клавиша будет перехватываться только тогда, когда выполняется Enabling Condition.
Посмотрим, насколько удачным окажется такой подход — обязательно делитесь обратной связью.

Очень важный новый узел в экосистеме BT: он позволяет по условию прерывать узлы, которые уже находятся в состоянии выполнения.
Обычно, если какой-то узел находится в состоянии Running (например, Wait или Until Success), остальные узлы дерева ничего сделать не могут — EyeAuras просто ждет, пока этот узел завершит свою работу.
Interrupter работает иначе: при выполнении он всегда запускает узел Condition (слева), даже если узел Action (справа) уже находится в состоянии Running. Более того, если Condition завершается с Success, управление не возвращается к уже выполняющемуся Action — он будет прерван и больше не продолжит работу.
Это можно использовать, чтобы останавливать длительные действия (например, Wait) или по требованию завершать циклы вроде Until Success. При правильных условиях этот узел дает очень мощные возможности.

Очень простой узел: он проверяет текущее состояние выбранной клавиши. Если клавиша нажата, узел возвращает Success.

Еще один узел, который хорошо сочетается с длительно работающими узлами, такими как Until Success. Он позволяет задать максимальное время, в течение которого дочерний узел может оставаться в состоянии Running.
Первый пример комбинации, который приходит в голову, выглядит так:

Комбинация Timeout -> Until Success -> Image Search фактически говорит дереву: Продолжай искать изображение, пока не получишь Success, но не дольше 2 секунд.
Started to work on startup time improvements and, more specifically, "cold" (first) start.
Here are startup times for the latest pack for GTA5 by @linx - https://eyeauras.net/share/S202503032233289fPxqP4AA0N0
v8215 - 33.41s
v8224 - 28.89s
So the new version is approximately 15% faster on the first launch.
Subsequent launches:
v8215 - 29.38s
v8224 - 27.10s
~8% faster.
I will keep working on improving those stats.
Иногда в ваших Packs не нужна вся функциональность, встроенная в EyeAuras.
Например, если ваш пак вообще не использует компьютерное зрение, нет большого смысла загружать в память модули, связанные с CV — это лишний расход CPU и RAM.
С появлением новых возможностей для прямой работы с приложениями, таких как чтение памяти, ожидается всё больше сценариев, где EyeAuras используется просто как платформа для разработки и распространения собственного приложения.
Именно для этого и предназначена эта функция: теперь вы можете отключать загрузку отдельных частей приложения.
Модули, которые добавлены в blacklist:
Сейчас можно исключать два типа модулей:
Примечание: HotkeyIsActive по-прежнему доступен.
Blacklist находится в конфигурации Pack. По умолчанию поставляется всё, но вы можете отключить два типа модулей.
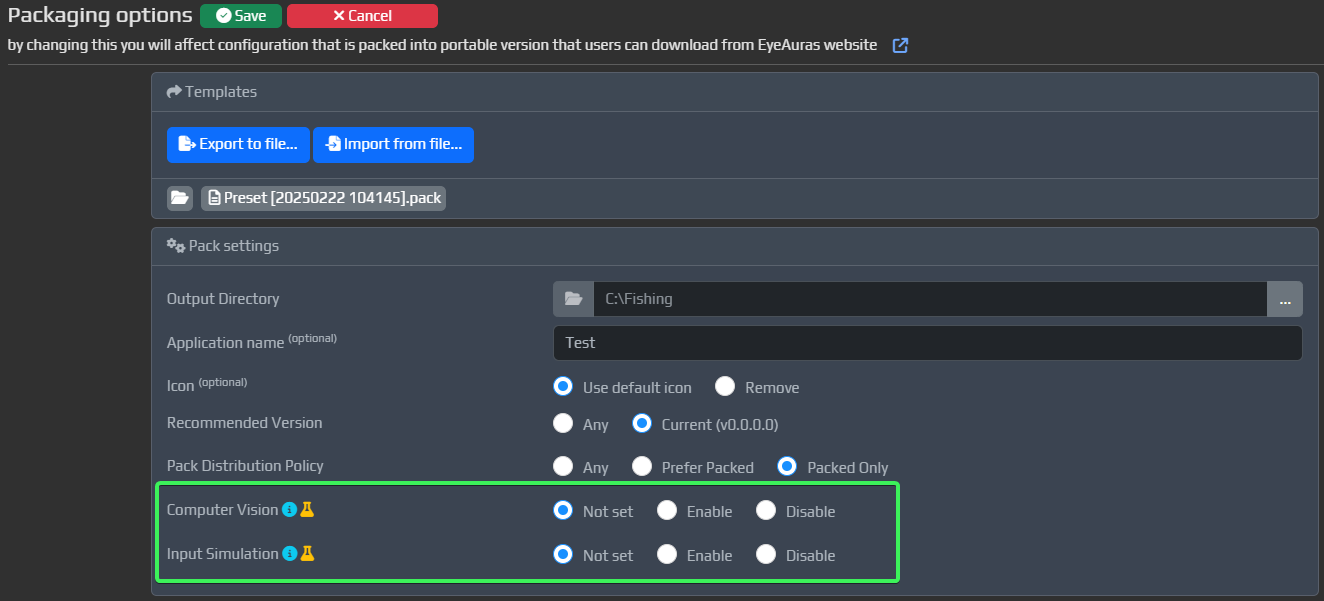
KeyLogin — это способ входа по одноразовому лицензионному ключу, без создания аккаунта. Эта система рассчитана на использование вместе с сублицензиями, чтобы ваши пользователи могли получить доступ к вашим пакам максимально быстро и просто.
Сейчас процесс выглядит так.
Для конечного пользователя (того, кто будет использовать пак):
Download packВот и всё. По-моему, проще уже некуда, и какое-то время всё останется именно в таком виде — посмотрим, как это покажет себя на практике.
Для вас (автора, который создаёт пак):
Да... для авторов процесс пока не такой прямолинейный. В этом году я его упростлю.
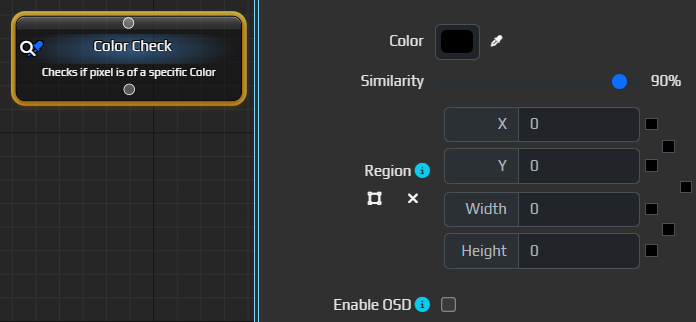
Allows to check that the color of a specific pixel(or region) matches selected one.
Probably one of the most useful nodes out there - fast, very easy to use and very flexible.
Allows to find image somewhere on the screen/in a selected region.

Added new node, which is intended to be used by those who are more comfortable with "classic" logic building.

 New node in BTs and Macros, which allows you to run ML search over a region of a screen/window.
It is still missing a lot of options currently present in MLSearchTrigger such as Configende/IoU thresholds, inference method, number of threads etc - those will be added in the nearest future.
New node in BTs and Macros, which allows you to run ML search over a region of a screen/window.
It is still missing a lot of options currently present in MLSearchTrigger such as Configende/IoU thresholds, inference method, number of threads etc - those will be added in the nearest future.
Note, that by itself this node does not do anything - you have to pair it with other nodes such as MLFindClass or MouseMove to get anything from it.
By default, it will pick the very first object and make it available for click via MouseMove - for some very simple scenarios that will be enough, for more complex one - use MLFindClass
The node will return Success only if there is at least one found prediction.

This node must be used in pair with MLSearch and allows to pick some class(~object) from the output generated by MLSearch - you can set some filtering parameters such as class name(s), minimum confidence threshold, size restrictions, etc. Those predictions which do not match any of those, will be filtered out.
Out of those predictions which will be left after filtering, you can make the node pick exactly one of them - it could be the very first in the list or the one with the highest confidence or even the one that is currently closest to the cursor.
The node will return Success only if there is at least one found prediction that matches all the criteria.
Of course, both MLSearch and MLFindClass could be used in combination with all other nodes. Here is, for example, priority-based target selection

В EyeAuras появился новый узел, доступный в Macros и BT.
Это первый узел из новой серии, ориентированной на компьютерное зрение. В будущем такие узлы станут прямой заменой триггеров, которые сейчас используются в Auras.
Переход займет много времени, и до полного соответствия возможностям текущих триггеров новые узлы, скорее всего, будут добираться еще несколько месяцев. Но постепенно мы к этому придем.
Обратите внимание: узлы не выполняются сами по себе. Захват изображения и анализ происходят ровно в тот момент, когда узел исполняется.

На старте производительность узлов может быть ниже, чем у прежних триггеров. Это связано с новыми механизмами, реализованными в Computer Vision API, на котором работают эти узлы.
Новые узлы записывают результаты в Variables, которые доступны через Bindings.
Сейчас для этого используется одна переменная — CvLastFoundRegion. Она хранит последнюю найденную область. Это могут быть координаты найденного пикселя, координаты найденного изображения или ML-класс.

В MouseMove появилась новая кнопка, которая позволяет быстро и удобно использовать эту переменную как источник координат.

Просто нажмите на кнопку, и при выполнении MouseMove попытается прочитать координаты из этой переменной.

IncludeTextSegments не сохранялся в конфигурацииImplementing a first prototype of the system which should allow to use CV API in BTs and Macros. The general idea is that now those methods which you call, be it ImageSearch/ColorSearch/etc, will cache underlying capture/processing mechanisms, which should make consequent similar calls from other parts of the program be much-much cheaper. We're talking seconds VS milliseconds here.
The mechanism tries to track which parts of the program use different parts of CV API and cache them accordingly. Monitor memory usage! Usually such systems tend to memory leak. A lot. Especially until properly tuned.
This API by itself is still very rough on edges and will be improved in upcoming releases.
This method is now part of Computer Vision API and allows to entirely bypass caching mechanism if you do not need it - e.g. your entire program is a single C# script. In that case it does not make sense to rely on EA caching mechanisms and pay extra (yet small) price for it
Clear() method to MiniProfilerВ последней версии я включил узлы Cooldown / Selector / Sequence для использования в Macros. Предполагалось, что это упростит создание ротаций и заодно принесёт в Macros некоторые возможности из BT.
Первые тесты показали, что этой функциональности ещё нужно время на доработку: она вызывает слишком много вопросов, особенно вокруг drag'n'drop.
Поэтому пока эти узлы снова отключены. Они вернутся позже, как только UX вокруг них будет готов.